📄 Guide
Push provisioning lets a cardholder add a DCS-issued Visa card to Apple Wallet (iOS) or Google Wallet (Android) with a single tap inside your app, instead of typing the card number into the wallet app. As a licensed issuer with its own BINs, DCS is the party that integrates with Apple’s and Google’s tokenization and provisioning authorization. Unlike the capabilities that can only redirect the user, the DeCard-Managed model does expose its own wallet binding REST endpoints (/card/v1/apple-bind-wallet and /card/v*/google-bind-wallet): your app forwards the cryptographic material the wallet gives it to DCS, DCS calls Visa tokenization, and DCS returns the provisioning payload the wallet needs, which your app passes back to the system wallet to finish the job.
Recommendation for new Apple Pay integrations: use DCSProvisioningSDK. The SDK uses a temporary ticket from POST /card/v1/bind-wallet-ticket and encapsulates the later PassKit and DCS exchange. This page keeps the underlying wallet binding REST endpoints for field reference, existing direct integrations and Google Pay integrations.
Prerequisite: the user must have passed KYC and been issued a card, and you must hold that card’s identifier (the last four digits of the PANcardMantissafor Apple and Google V1, orcardIdfor Google V2). For the issuing flow, see Issuing Cards.
Mental model: tokenization
Digital wallets protect a card through tokenization: the real card number (PAN) is replaced by a unique digital token.- One token per card per device: every “card × device” pair gets its own token, and the tokens are independent of each other.
- End-to-end protection: the token stands in for the real PAN at transaction time, so the plaintext PAN never reaches the merchant or the wallet.
- Token lifecycle (five stages): created when the card is added → activated after verification → used in place of the real PAN at transaction time → rotated periodically for security → destroyed when the card is removed.
Two provisioning paths
This page is about in-app provisioning, which requires integration work on your side and calls to the DCS wallet binding API. Manual provisioning needs no development at all (DCS supports it by default) and is done by the cardholder inside the wallet app; the steps are reproduced below so you can reuse them in your own help content.
Apple Pay manual provisioning (iPhone, 3 steps)
- Open the Wallet app: open Wallet on the iPhone and tap ”+” in the top right corner.
- Enter the card details: hold the card near the iPhone to add it, or tap “Enter Card Details Manually” and follow the on-screen instructions.
- Verify identity: choose a verification method when prompted (SMS or email) and enter the code to finish.
Google Pay manual provisioning (Android, 7 steps)
- Open the Google Wallet app: the cardholder opens Google Wallet and must be signed in to a Google account for mobile payments to work.
- Start adding a card: the cardholder taps “Add to Wallet” to begin manual provisioning.
- Choose the card type: if prompted, the cardholder selects “Payment card”.
- Enter the card details manually: the cardholder chooses “Or enter details manually” and types in the card number, expiry date and CVV.
- Accept the terms: the cardholder reviews and accepts the terms and conditions.
- Verify identity: a verification code is sent by SMS or email for identity verification.
- Finish provisioning: the cardholder enters the code and, on success, sees a confirmation in the Google Wallet app.
The exact steps vary a little with the handset, the OS version and wallet app updates. Contact the DCS team if anything is unclear.
The four roles
On the Apple side DCS acts as the BIN Sponsor and the partner as the Program Manager; on the Google side DCS acts as the Issuer and the partner as the Program Manager.
Commercial onboarding (one-off, before go-live)
Before cards can be provisioned into wallets in production, you, DCS and Apple or Google have to complete a one-off round of authorization and certification. Apple and Google run separate tracks:Apple Pay onboarding
Google Pay onboarding
The screen-by-screen detail on the wallet side is governed by Apple’s and Google’s own issuer documentation, which this page does not reproduce. Contact the DCS team for further integration detail.
Runtime provisioning flow (in-app provisioning)
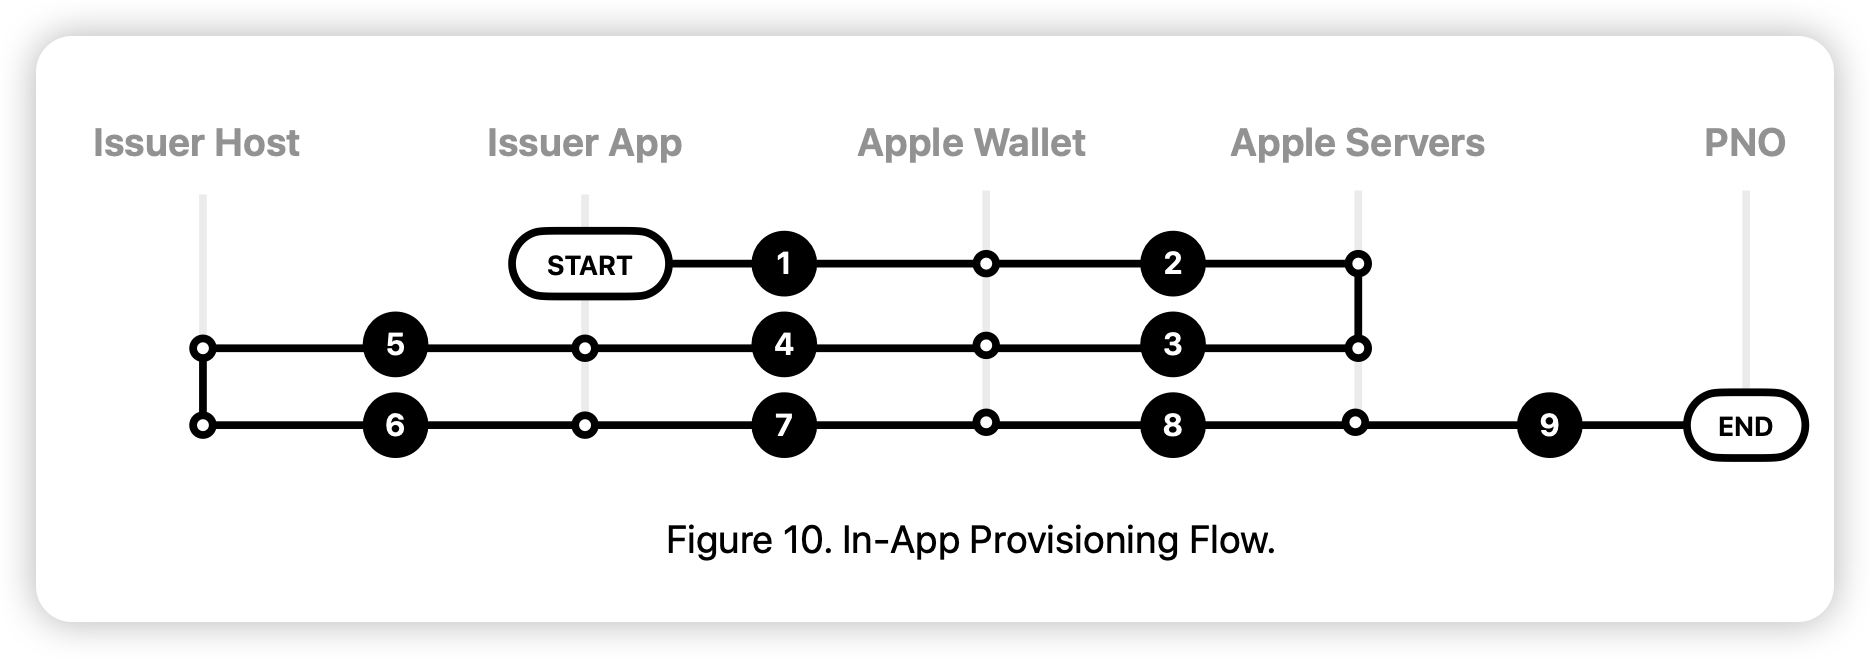
Once you are integrated, every tap on “add to wallet” in your app triggers the exchange shown below. Apple is used as the example; Google works the same way and differs only in the request and response fields:The diagram shows the underlying direct flow. With DCSProvisioningSDK, your app hands the ticket and card parameters to the SDK, which encapsulates the exchange of PassKit device artifacts with DCS; see the Implementation Guide.


Wallet binding API
The Apple binding endpoint isPOST /card/v1/apple-bind-wallet (it identifies the card with the last four digits of the PAN, cardMantissa). For Google, DCS offers V1 and V2; use V2 for every new Google integration (it identifies the card precisely with cardId).
The only difference between Google V2 and V1 is how the card is identified: V2 usescardIdwhere V1 usescardMantissa.externalUserIdis required in both versions, and every other field is identical.
Apple Pay wallet binding
Request fields
The required fields areexternalUserId/applePublicCertificates/appleNonce/appleNonceSignature;cardMantissais optional.
Request example (masked)
Response
A successful call returns the common envelope{ code, message, messageDetail, data } with code = SYS_SUCCESS. data holds the payload Apple Wallet needs to complete tokenization:
Google Pay wallet binding
Request fields
Google V2 requires onlyexternalUserIdandcardId;clientCustomerIdanddeviceIdare both optional. V1 requires onlyexternalUserId.
Request example (V2, masked)
Response
On successcode = SYS_SUCCESS and data holds what Google Pay needs for tokenization:
Error handling
Before it can be provisioned, the card must be in a normal, usable state: activated, not frozen and not canceled. If the status is anything else, activate the card or lift the restriction first, then start provisioning.Testing notes
- Push provisioning has to be tested with production cards: Visa provides no sandbox tokenization cards, so the full provisioning flow cannot be verified in the sandbox.
- iOS builds must be installed through TestFlight for testing; running straight from Xcode makes provisioning fail.
Today, provisioning success or failure does not generate an extra webhook event. Treat the response from this API and from Apple or Google Wallet as authoritative. Asynchronous provisioning events would require new platform capability.
Next steps
- Apple Pay SDK Installation — add DCSProvisioningSDK and configure the entitlement, App Group and card profile
- Implementation Guide — exchange the ticket and start in-app provisioning
- Wallet Extensions Guide — expose the provisioning entry point inside Apple Wallet
- Issuing Cards — issue the card first and obtain its
cardId/cardMantissa - Managing Cards · Overview — freezing and unfreezing, card replacement, the state machine
- Managing a Card’s PIN — also card management, with the PIN handled through a guidance page
- Webhook + WebSocket notifications — other card and transaction events; provisioning events are not among them today